Exercises to relieve back pain
Why do exercises help with back pain?
Back pain has become a widespread disease in modern society. And that is primarily due to our everyday behaviour: most people spent most of their time seated on a chair, and move rarely. The lack of movement lead to stiff muscles in the back and neck, but also in the legs, stomach and chest. They shorten and harden more and more. For many people, tension-related back pain is a constant companion.
A simple but effective remedy for back pain is exercise. In addition to back-friendly sports (such as walking, jogging, yoga or Nordic walking), back exercises that specifically stretch, loosen and strengthen the tense and shortened muscles are ideal. This promotes blood circulation and therefore the regeneration of the muscle tissue. With regular training, the spine can regain greater mobility and be free from pain.
Acute tension-related pain in the back can therefore be actively alleviated with the appropriate exercises. However, it is better not to let it get that far. Regular training can prevent further muscle tension and therefore chronic back pain and contribute to a strong, healthy back.
By the way, various studies have shown that tension in the lower back can be treated even more effectively if the exercises to relieve back pain are combined with heat.1+2 Optimise your training by using ThermaCare® HeatWraps for back pain before or after.
-

THERMACARE® for back pain
for the treatment of muscular tension and pain in the lower back
Exercise program for back pain
The following back exercises can be performed anywhere, at work, at home or on the go. All you need is a mat, two chairs, a small ball and an everyday object (for example a wooden knob) to apply pressure. In the case of chronic complaints, we recommend that you vary the exercises in order to stimulate the back muscles again and again and to integrate further movement sequences. This way the training will not be boring and you can always adapt the program to your current needs. The most important thing is constancy.
It is best to do the exercises to relieve back pain every day for about 15 minutes. This is better for your back than just exercising for several hours once a week. Do little but often, this is our best advice.
Make sure to adhere to the specified stretching times. For stretching to be effective you have to perform the exercise for at least 30 seconds. Therefore, the stretching times in the exercises for back pain are established at one to two and a half minutes. This produces a good muscle relaxation, increases articular mobility, and improves pain.
Exercise at the intensity that suits you: During the exercises you should not only feel a slight tension, but also a significant stretching pain in the affected muscles. Only train within an intensity zone where you can tolerate the stretching pain well. This means that you can continue to breathe calmly and relax the muscles into the stretch.
Follow the instructions for each back pain exercise. Maintain the position exactly during the exercises. Some of the following exercises have variations for different levels of fitness and flexibility. If anything is unclear, you can use the pictures as a guide.
If muscle pain occurs after back training, the application of heat can ensure rapid regeneration of the back muscles. You will find further information and practical tips on the subject of heat therapy for back pain here:
Caution: If there is no improvement after two weeks of regular training, please have the cause of your back pain determined by a doctor. In the event of injuries, inflammation or herniated discs, we recommend you to be visited by a doctor who will determine whether your body is ready for these exercises.
If you experience acute pain or other side effects when trying these exercises, you should stop immediately and seek medical care.
EXERCISE 1
Hanging groin
Often, too much tension in the front of the body and the resulting compression in the groin area are the cause of back pain. With this back pain exercise, you can reduce tension and resolve the compression.
- Display step-by-step instructions
-
Step 1: Stand on all fours with your arms and thighs upright, with your hands pointing outwards at a 45-degree angle. Let the groin area hang down slowly. As the mobility of your back increases, you can stretch your arms fully and move your head backwards.
Caution: If you have problems with your knees and insufficient strength in your arms and shoulders to be able to support yourself with your arms stretched out or if you are too immobile in your back to be able to overextend yourself backwards, start in the prone position. Support your forearms, straighten your arms and straighten your upper body.
Step 2: Push your hands forward enough to allow your pelvis to sag. Gently lower your groin towards the floor for 30 seconds. Tense your stomach so that your pubic bone moves forward and upwards and you do not come into the hollow back position. Stay there for two more minutes.
Step 3: Then go into the countermovement: Bring your buttocks towards your heels and lay your torso forward. Remain in this position for at least a minute.

EXERCISE 2
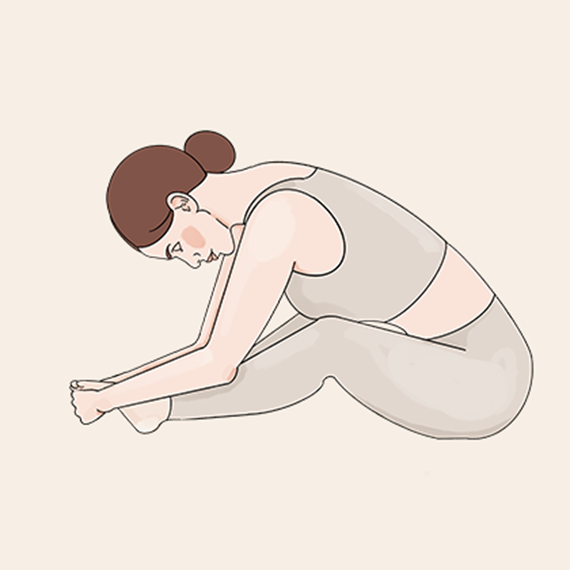
Hollow back
With this exercise, you can effectively counteract back pain caused by hyperlordosis by stretching and loosening the muscle area and the fasciae on the lumbar spine.
- Display step-by-step instructions
-
Step 1: Sit down and move your legs forward. Let your knees fall outward and bring the soles of your feet together.
Step 2: Grasp the front of your feet, pull your torso forward, and let your head hang down. Stay in this stretch position for two to two and a half minutes.
EXERCISE 3
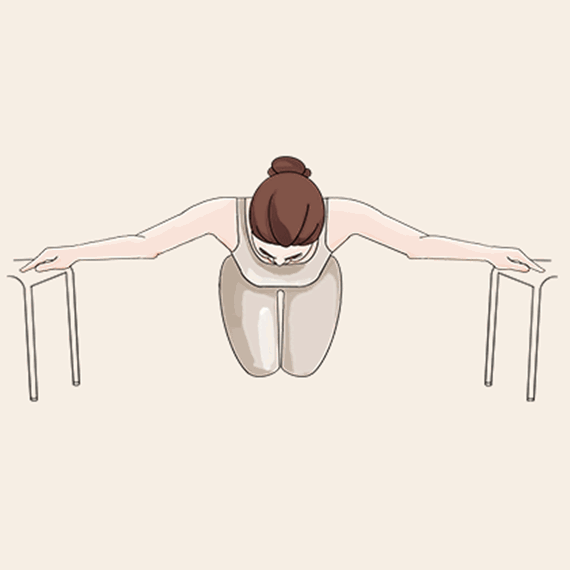
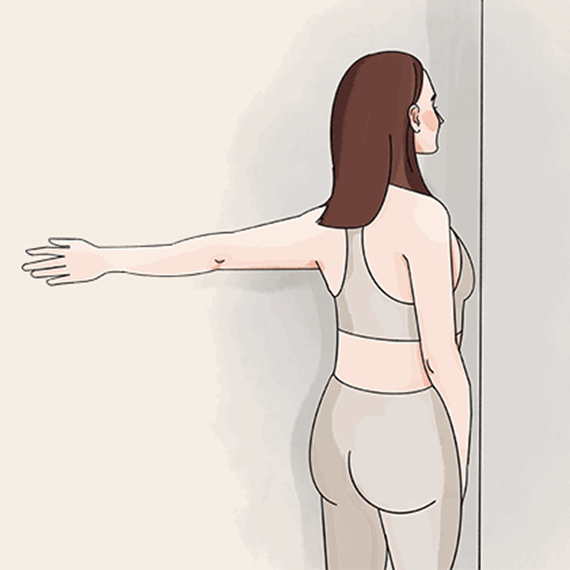
Thoracic spine stiffness
When there is a blockage in the thoracic spine, symptoms can range from shortness of breath to pain in the upper back to an oppressive or stabbing sensation in the chest. If you have had a doctor determine your symptoms and there is actually only tension or blockage causing the symptoms, you can use this exercise to stretch the area around the chest muscles very effectively and thereby obtain relief.
- Display step-by-step instructions
-
Step 1: Place two chairs so far apart that you can rest your hands on the seats with your arms outstretched to the side. Place a mat parallel to the chairs and kneel on the mat so that both chairs are equidistant from you.
Step 2: Bend your upper body forward, stretch your arms completely on both sides and place your palms on the seat surfaces. Make sure that your upper body is slightly above your outstretched arms.
Step 3: Let your upper body sink towards the floor as far as the pain is bearable for you and you can relax into the stretch.
Step 4: Stay in this position for about two minutes and inhale and exhale deeply. As you exhale, try to let your upper body sink lower and lower until you feel a very noticeable stretching pain in the chest.
EXERCISE 4
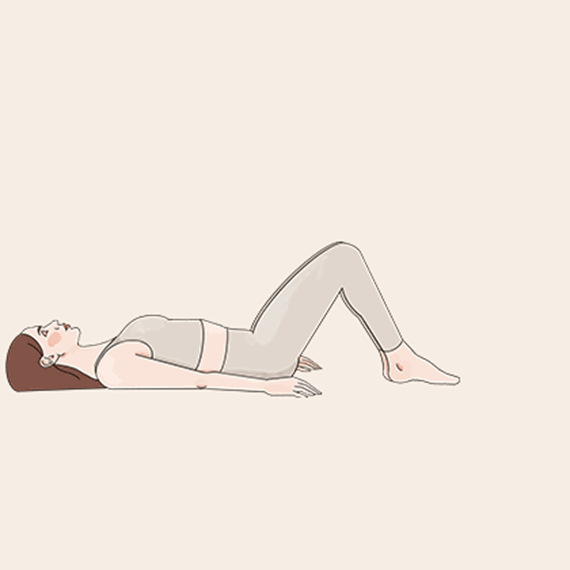
Lumbago – Exercise for acute phase
Sudden low back pain that radiates into one leg could be lumbago. Once you have had the cause determined by a doctor and there are no contraindications to movement and stretching, this exercise can help with acute low back pain.
- Display step-by-step instructions
-
Step 1: Lie on your back, place your feet on the floor with your knees bent so that your thighs and lower legs are at a 90-degree angle, and pull your chin toward your chest as far as possible.
Step 2: Push your lumbar spine towards the floor as far as possible.
Step 3: Maintain this tension throughout the exercise and try to crawl with your feet away from your buttocks, millimetre by millimetre, until you can straighten your legs fully and rest them on the floor.
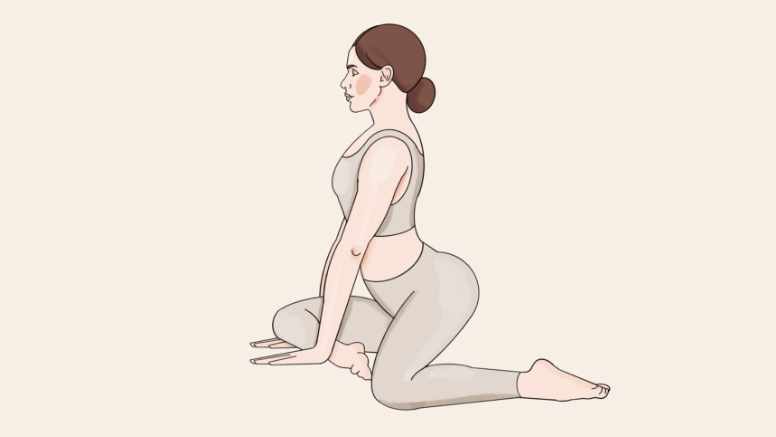
EXERCISE 5
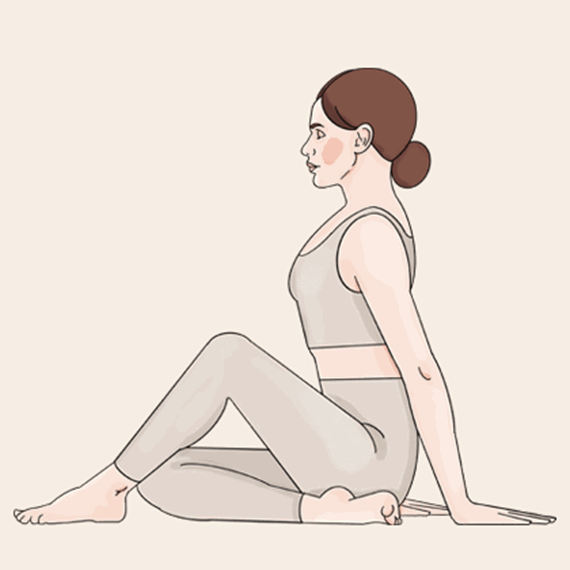
Low back pain and hip pain
This exercise is ideal for lumbar and hip pain. You can stretch the buttocks and the hip flexors at the same time, i.e. muscle parts that are tightly tense and shortened in many lumbar spine complaints. The hip is thereby mobilised.
- Display step-by-step instructions
-
Step 1: Sit on a mat and stretch both legs forward. Slide the right leg under the hollow of the knee of the extended left leg so that the thigh and lower leg of the right leg form a 90-degree angle.
Step 2: Bring the outstretched left leg back and twist it as far as possible onto the back of the foot. Important: Do the movement slowly. The body takes a while to get used to the new joint angles – especially when the muscles are still very tense.
Step 3: Keep the right leg in the right-angled position and support yourself with your arms to the right and left of the bent leg. Stand up straight as far as possible.
Caution: If you cannot hold the front leg at a 90-degree angle, move it closer to your body. If you do this exercise regularly, over time you will mobilise your hips enough to bring your leg closer and closer to the 90-degree angle.
Step 4: Stay in this position for two to two and a half minutes and try to relax into this stretch.
Step 5: Then do this exercise with the other leg.
EXERCISE 6
Mobilise your hips with a pressure point massage
In the case of a hip blockage, you can use the following exercise to release the tension in the hip region and thereby mobilise the hips. You will need a small object with which you can apply pressure to certain points in the muscles. The “Pressure set” developed by Liebscher & Bracht® for light osteopressure is ideal for this. You can also work on these points with a cheaper alternative such as a massage knob or an everyday object (e.g. wooden knob, doorstop or bottle cork). It is important that this object lies comfortably in the hand and is soft or rounded at the pressure point.
- Display step-by-step instructions
-
Step 1: Position the pusher or other object in the exact spot on the buttocks where there is pain when walking or lifting the leg and gently sit on it. If the area is too sensitive, you can also do the exercise on the wall and lean on the pusher/object while standing. Stay in this position up to two minutes. As the pain subsides, you can move your position slightly to work on a larger area around the point.
Step 2: Lie on your back and touch the hip spine, this is the easily palpable protrusion of bones on the front right and left of the hip. From the hip spine, go down a little and towards the pubic bone and find the point that is painful to pressure. At exactly this point, press the pusher or everyday object into the tissue from above. Keep the pressure on the point for a minute or two. Then find the point on the other side and apply pressure there for a minute or two.
Alternative:
Place a small ball under the painful buttock and sit on the ball. Then slowly and carefully roll over the gluteus muscle and pause where the pain becomes more intense. Then make small spirals around the pain point. It is important that you move slowly and with pressure. Do the exercise for a minute or two, switching to the other side if necessary.

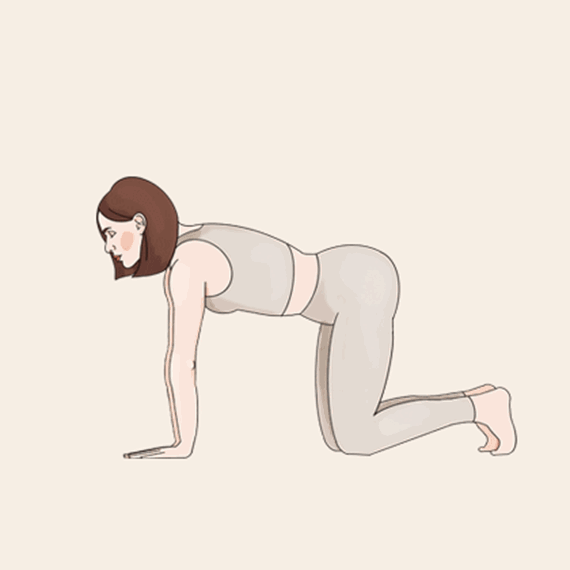
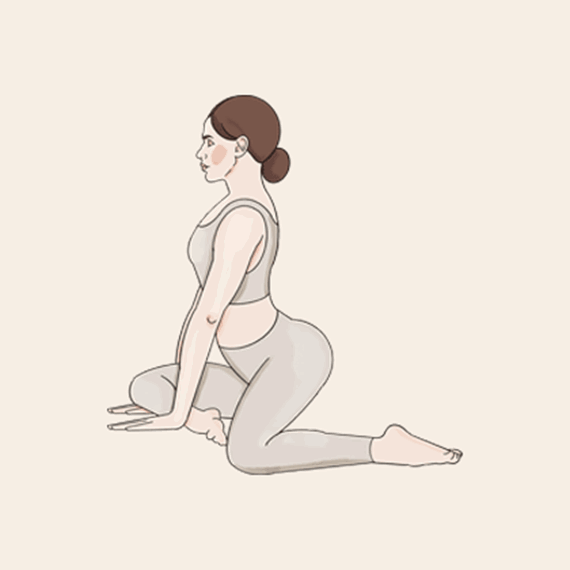
EXERCISE 7
Piriformis Syndrome
The piriformis muscle lies under the gluteus muscle and connects the sacrum with the thigh bone. Depending on the sitting position or the strain on the muscles, this muscle can cramp and press on the sciatic nerve in the buttocks, irritating it: Stabbing or pulling pains occur that can radiate into one leg. With this simple exercise, you can quickly relieve pain and prevent over-tension.
- Display step-by-step instructions
-
Step 1: Stand on all fours.
Step 2: Raise one leg so that it is stretched out in the air.
Step 3: Push your upper body a little forward and shift your body weight to the painful buttock side, i.e. to the left or right. Try to hold this stretch for a few seconds.
Step 4: If you want to intensify this exercise, raise and lower your buttocks towards the standing leg by tensing and loosening them. This exercises the piriformis muscle in a targeted way and you can alleviate the pain caused by the irritated sciatic nerve.
EXERCISE 8
Sciatica pain
You can also use this exercise to reduce significantly sciatica pain radiating from the lower back into the buttocks, hips or legs.
- Display step-by-step instructions
-
Step 1: Sit on a mat, bend your left leg and slide it under the thigh of your right leg. The left foot is below the right knee and the left knee is bent at a 90-degree angle.
Step 2: Stand on your right leg and pull yourself forward with your torso straight. Make sure to draw your back into a hollow back position as an exception for this exercise, i.e. not to round it. Feel into the stretch. You should now feel a pull in your left buttock.
Step 3: Move your torso and hips a little to the right and then to the left. Pay attention to where the sciatic pain is most intense. You should pause at this point for a minute or two. In this way, the overstretched muscles can relax again.
Step 4: Repeat the exercise on the other side.
FREQUENTLY ASKED QUESTIONS
- What exercises help with back pain?
-
For tension-related back pain, exercises that loosen, stretch and strengthen the lower and upper back muscles help. When done regularly, the right exercises can also help to prevent back pain. In combination with local heat, the exercises can be even more effective on the lower and upper back areas and relieve muscle tension.
- What helps relieve back pain?
-
Heat and exercise help relieve acute, subacute and chronic non-specific back pain. They relieve the pain and help eliminate the stiffness that can be the cause of the back pain. Pain killers also help quickly against the pain, but do not fight the cause.
- How can back pain be prevented?
-
Back pain can be prevented with regular exercise, sport and with and active lifestyle also at work. By exercising your back, neck and abdominal muscles and making sure to stand up regularly while at work, you can prevent back pain and related problems.

1: Mayer JM, Ralph L, Look M et al. Treating acute low back pain with continuous low-level heat wrap therapy and/or exercise: a randomised controlled trial. The Spine Journal 5 (2005): 395 – 403.
2: Petrofsky, Jerrold, et al. Use of ThermaCare heat wraps as an adjunct to physical therapy. International Journal of Therapy & Rehabilitation, 2014, 21. Annual No. 9.